Nowadays, many computer manufacturers, build their computer models (commonly laptops) without including an optical disk drive with them in order to accomplish a smaller – in dimensions – product or for cost reasons. But this becomes a problem in some cases, e.g. when you want to re-install the operating system or you want to upgrade it to another version you purchased. For such cases you have to create a bootable USB disk to accomplish that task.
This tutorial was written for all users that their computer doesn’t include an optical disk drive (or the optical disk drive is damaged) or they want to install Windows 7 from a USB. *
* Note: This guide works for creating a Windows USB bootable disk for all Windows versions (8, 7, Vista & XP). The only thing needed is to have the corresponding Windows version stored in a ISO image file.
How to create a Windows 7 USB Bootable disk.
To install Windows 7 from USB you have to put the Windows 7 ISO file into a USB disk by following the detailed instructions below:
STEP 1: DOWNLOAD WINDOWS 7 ISO FILE.
Navigate to this page and download the Windows 7 ISO image, according the version and product key you own.
STEP 2. DOWNLOAD RUFUS USB BOOTABLE CREATOR UTILITY.
Navigate to this page and download the RUFUS USB Bootable Creator Utility on your computer.
STEP 3. CREATE A BOOTABLE WINDOWS 7 USB USING RUFUS USB BOOTABLE CREATOR UTILITY.
1. Plug an empty USB disk on your computer or a USB that you don’t want the data on it (IMPORTANT: THE DATA ON THE USB WILL BE ERASED!)
2. Double-click to open “rufus” utility you downloaded at step 2.
3. Make sure that you select the correct (empty) USB disk.

4. Click the “Click to select…” icon next to “Create a bootable disk using” option.

5. Choose the Windows 7 ISO image you downloaded at step 1 and click Open.

6. Finally click the Start button and wait until the Windows 7 USB boot disk is created.

When the operation is completed, you ‘re almost ready to install Windows 7 from USB.
STEP 4: MODIFY BIOS SETTINGS AND CHANGE THE BOOT ORDER TO USB.
The last thing that you have to do, is to enter into CMOS setup utility (at the computer where you want to install Windows) and change the boot order to USB. To do that:
1. Plug the Windows 7 Boot USB disk on an empty USB port.
2. Power On the computer & press the corresponding key to enter CMOS setup utility. (DEL or F1 or F2 or F10) *
* Note: The way to enter into BIOS (CMOS) Setup settings depends on the computer manufacturer.
3. Inside CMOS setup, change the “Boot Order”* setting to USB.
* Note: The “Boot Order” setting, is commonly found under “Advanced features” menu.
4. Save and exit from CMOS setup settings.
The Windows 7 installation is starting….
Install Windows 7 from the media you created:
1. After the installation media is created, follow the steps below to use it.
1.1 Attach the pendrive or insert DVD on the PC where you want to install Windows 7.
1.2 Restart your PC, and then press any key to boot from the USB flash drive or the DVD.

*If you restart your PC and your current version of Windows starts, you might have to open a boot menu or change the boot order in your PC’s BIOS or UEFI settings so that your PC boots from the media. To open a boot menu or change the boot order, you’ll typically need to press a combination of keys (such as F2, F12, Delete, or Esc) immediately after you turn on your PC. For instructions on changing the boot order for your PC, check the documentation that came with your PC or go to the manufacturer’s website.
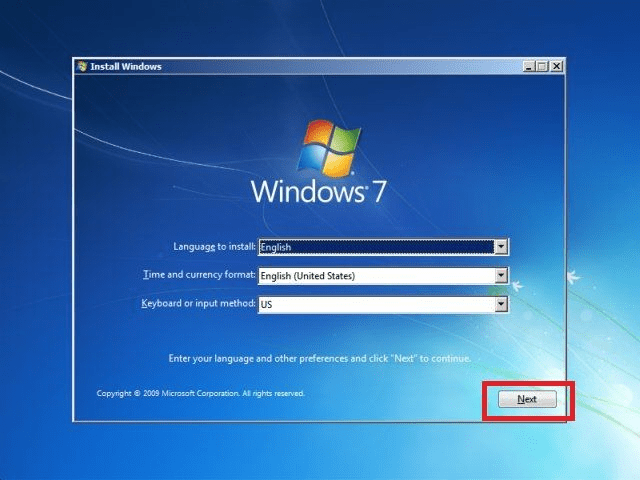
2. On the Install Windows 7 page, select your language, time, and keyboard preferences and then select Next .
3. Click on ‘ Install now’

4. When you reach the “Which type of installation do you want?” screen, click “Custom” to perform a clean installation and remove everything on your PC.

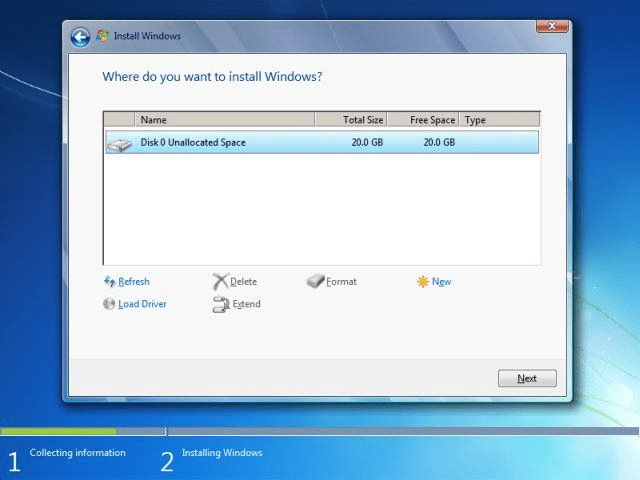
5. On the next screen, select the hard drive you want to install Windows on and erase it. If you have multiple partitions on that drive, you may want to erase those as well.
Warning: When you delete a partition, you’re also deleting all the files on that partition. Be sure you have backups of any important files before doing this!
When you’re done erasing partitions, you should have a big block of “Unallocated Space”. Select that, click “New”, and once it’s formatted your drive, click Next.
6. Windows 7 will install itself and may restart a few times during this process.

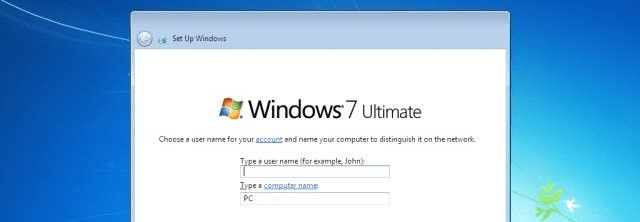
7. Provide your username and a computer name.
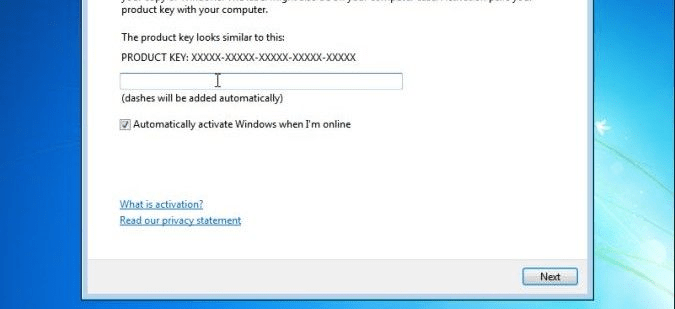
8. The next step is to activate your Windows. Enter the product key we provided in our email.
9. Configure your time zone.

10. Configure your location.
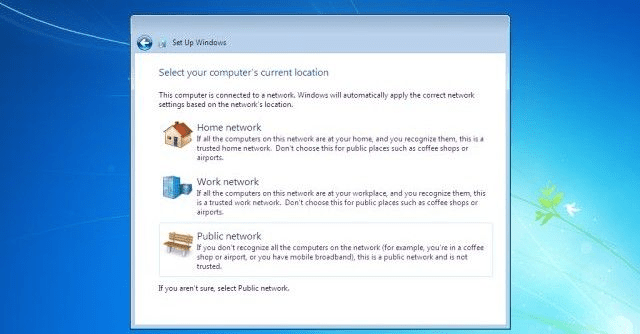
*Your location will determine the firewall settings for your newly installed Windows 7. You have three choices: home, work or public network. Home and work networks are supposed to be trusted, so you should not experience any problems adding other machines to your group or sharing data with them.
However, the public network is meant to be untrusted. So if you have installed Windows 7 in, let’s say, Internet cafe, then you should choose the third option.
11. Remember to install all the last updated drivers for your computer.