Did you notice Windows PC is very slow, not responding, and Disk Usage is consistently at 100 percent in Task Manager? Sometimes after Windows update, you may notice high Disk usage, even when you are not running any intensive programs. Several factors can contribute to 100 disk usage in Windows 10, problems with disk drive, Background app activities, and corrupt system files are common. Depending on the cause of your problem, you can try different methods to fix the Windows 10 100 disk usage. Here are some of the most effective solutions that have worked for many users fix 100 Disk usage Windows 11 and Windows 10.
Common reason behind High Disk usage?
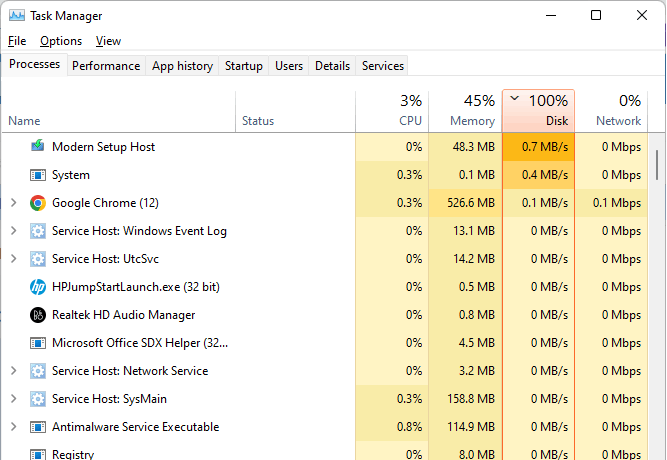
Several factors can contribute to 100% disk usage on Windows 10/11, A failing hard drive, corrupted system files, and Malicious software, including viruses and malware infection, are common.
Restart your device
A simple restart can work wonders by refreshing system memory, clearing temporary glitches, and resetting various system processes. It’s like giving your computer a fresh start, often resolving software-related issues that may be causing high disk usage.
Simply click on the Start menu, then select the Power icon, and choose Restart. Alternatively, you can press and hold the power button until your device powers off, then turn it back on.
Update Windows 10
Windows updates not only introduce new features but also include critical bug fixes, performance enhancements, and security patches. By staying up to date, you not only fix the 100% disk problem but also optimize overall system performance and stability.
Go to Settings > Update & Security > Windows Update. Click on “Check for updates” and install any available updates.
Reduce startup apps
Many applications automatically launch at startup, running in the background and consuming system resources. This can lead to increased disk usage, especially if multiple apps are competing for resources simultaneously. By reducing the number of startup apps, you alleviate the workload on your disk during system boot, potentially resolving the 100% disk usage issue.
Right-click on the taskbar and select Task Manager. Go to the Startup tab, right-click on unnecessary startup apps, and select Disable.
Scan for Virus malware infection
Viruses and malware can wreak havoc on your system, including causing high disk usage. These malicious programs often run hidden processes in the background, consuming disk resources and impacting system performance. By performing a thorough virus scan, you can detect and remove these harmful entities, restoring normal disk usage and enhancing system security.
Use Windows Security (Windows Defender) or install a reputable antivirus program. Perform a full system scan to check for and remove any viruses or malware.
Clean boot your computer
Booting into a clean environment disables non-essential startup processes and services, allowing you to isolate potential causes of high disk usage. By starting with a minimal set of drivers and startup programs, you can determine if third-party software is contributing to the problem.
Press Win + R, type msconfig, and hit Enter. In the System Configuration window, go to the Services tab, check “Hide all Microsoft services,” then click “Disable all.” Go to the Startup tab and click “Open Task Manager.” Disable startup items one by one.
Disable Windows Search and SysMain (Superfetch)
While services like Windows Search and Sysmain (formerly Superfetch) are designed to improve system performance, they can sometimes lead to excessive disk activity. Disabling these services temporarily can reduce disk usage and alleviate the strain on your system.
Press Win + R, type services.msc, and hit Enter. Find “Windows Search” or “Sysmain” (Superfetch), right-click, select Properties, change Startup type to Disabled, and click Stop.
Check for disk errors
Disk errors can occur due to various factors, including hardware malfunctions, power outages, or improper shutdowns. These errors can impact disk performance and lead to high disk usage. By checking for and repairing disk errors, you ensure the integrity of your file system and prevent further data loss or corruption.
Open File Explorer, right-click on the drive you want to check, select Properties, go to the Tools tab, and click “Check” under Error checking. Follow the on-screen instructions to scan and repair disk errors.
Run Disk Cleanup free up space
Over time, your disk accumulates temporary files, system cache, and other unnecessary data. This can consume valuable disk space and contribute to high disk usage. Running Disk Cleanup removes these unnecessary files, freeing up disk space and reducing disk congestion.
Type “Disk Cleanup” in the Start menu search and select the tool. Choose the drive you want to clean, select the types of files you want to delete, and click OK.
Reset virtual memory
Virtual memory, also known as the paging file, supplements physical RAM by using disk space as temporary memory storage. Adjusting virtual memory settings can optimize disk usage for memory management, reducing reliance on the disk and alleviating high disk usage.
Go to Control Panel > System and Security > System > Advanced system settings. Under the Advanced tab, click Settings in the Performance section. Go to the Advanced tab, click Change under Virtual memory, uncheck “Automatically manage paging file size for all drives,” select a drive, and click “Custom size.” Set Initial size and Maximum size, then click Set and OK.
Update device drivers
Outdated or incompatible device drivers can cause performance issues, including high disk usage. Updating drivers ensures compatibility with the latest Windows updates and may include optimizations to improve disk efficiency.
Visit the website of your device manufacturer or use Device Manager to update drivers. Right-click on a device, select Update driver, and follow the prompts to search automatically for updated driver software.
Repair system files using SFC and DISM
Corrupted system files can lead to performance issues, including high disk usage. System File Checker (SFC) and Deployment Image Servicing and Management (DISM) are built-in Windows tools that help repair corrupted system files and maintain system integrity.
Open Command Prompt as administrator, type sfc /scannow, and press Enter to run the System File Checker. If issues persist, run DISM by typing DISM /Online /Cleanup-Image /RestoreHealth and pressing Enter.
Performing these steps can help diagnose and resolve the issue of high disk usage on Windows 10, improving system performance and stability.